Using the methods, filters, and actions provided by {eac}Doojigger.
Document Header
Homepage:https://eacDoojigger.earthasylum.com/
Author:EarthAsylum Consulting
Last Updated:05-Sep-2024
Contributors:earthasylum, Kevin Burkholder
Requires {eac}Doojigger:2.6
WordPress URI:https://wordpress.org/plugins/search/earthasylum/
GitHub URI:https://github.com/EarthAsylum/docs.eacDoojigger/wiki/
How To...
Table of Contents
-
About the {eac}Doojigger File System Extension
- Access the WordPress file system via FTP/SSH with secure, compatible file permissions.
-
Using the {eac}Doojigger Installer
- Install a Must-Use plugin file, theme file, or other file using the WP_Filesystem API.
-
Implementing and Using Advanced Mode
- Using {eac}Doojigger's "Advanced Mode" to control options and features.
-
Set Cookies Using The WP Consent API
- {eac}Doojigger supports the WP Consent API plugin with a
set_cookie()method.
- {eac}Doojigger supports the WP Consent API plugin with a
-
- Using the {eac}Doojigger debugging log methods.
-
Using Conditional Traits in PHP
- Conditionally load backend (or frontend) code using traits.
-
Clone an {eac}Doojigger Extension
- Use an {eac}Doojigger extension in your derivative plugin (myAwesomPlugin).
-
Using administrator option field methods
- Add input fields to your custom screens.
-
Using administrator contextual help methods
- Add contextual help to your custom screens.
About the {eac}Doojigger File System Extension
To properly install extensions and create folders & files, {eac}Doojigger uses the WordPress file access sub-system - WP_Filesystem. This system provides access to the web server files using FTP (file transfer protocol), FTPS (FTP over ssl), or SSH (secure shell or SFTP).
These protocols create files and folders using your ftp user name rather than the default web server user name (e.g. "www"", "www-data", "nobody", "apache") which should maintain proper and secure file permissions.
WordPress uses the WP_Filesystem when installing updates, plugins, and themes. You have probably seen the "Connection Information" form when applying updates. Unlike WordPress, {eac}Doojigger retains your connection information, in a secure, encrypted state, to be used when needed. Your secure credentials will be used by WordPress so you never see the "Connection Information" form again.
{eac}Doojigger provides two methods for accessing the WP_Filesystem:
The first (load_wp_filesystem), will initiate the "Connection Information" form (if $useform is not false) when required and either return the file system object or false.
public function load_wp_filesystem($useForm = false, string $notice = '', array $args = [])- $useForm (false) when truthy, prompt for credentials if needed
- $notice ('') display an 'admin notice' message before the form
- $args ([]) request_filesystem_credential arguments (override defaults)
The second (link_wp_filesystem), provides a standard WordPress administrator notice, if the "Connection Information" form is required, with a link to access that form. This is less intrusive then load_wp_filesystem() and always returns false unless and until the user clicks the link.
public function link_wp_filesystem($useForm = true, string $notice = '', array $args = [])- $useForm (true) when truthy, display notice with link
- $notice ('') display an 'admin notice' message before the form
- $args ([]) request_filesystem_credential arguments (override defaults)
Examples:
Redirects to the "Connection Information" form so the user can enter their FTP credentials. If credentials are already available, returns the WP_Filesystem object in $fs.
$fs = $this->fs->load_wp_filesystem(true,
    '{...something...} requires WordPress file system access.'
);
Displays an admin notice at the top of an administrator page providing a link to the "Connection Information" form. If credentials are already available, returns the WP_Filesystem object in $fs.
$fs = $this->fs->link_wp_filesystem(true,
    '{...something...} requires WordPress file system access.'
);
Returns either false (we don't have FTP credentials), or the WP_Filesystem object.
$fs = $this->fs->load_wp_filesystem();In all cases, $fs will either be false or the WP_Filesystem object...
if ($fs) {
    // we can now use WP_Filesystem methods
    $fs->copy('thisfile','thatfile');
}
In addition to the above methods, there are 2 corresponding filters that work essentially the same way...
load_wp_filesystem()
global $wp_filesystem;
$fs = $this->apply_filters('load_filesystem'($wp_filesystem, true,
    '{...something...} requires WordPress file system access.'
);
link_wp_filesystem()
global $wp_filesystem;
$fs = $this->apply_filters('link_filesystem'($wp_filesystem, true,
    '{...something...} requires WordPress file system access.'
);
Note that once FTP credentials are entered via the "Connection Information" form, {eac}Doojigger saves them (encrypted) so the form is never needed again. FTP credentials can also be added to wp-config.php so that the "Connection Information" form is not required.
Using the {eac}Doojigger Installer
The installer extension is primarily intended to install a PHP script into the WordPress "must use plugins" folder (WPMU_PLUGIN_DIR), however, it may be used to install files in any folder within the WordPress directory structure.
In it's simplest form, you create an array of options which define the installer parameters (source, destination) when invoking the installer...
$this->installer->invoke('install',false,
    'title'         => 'My Awesome MU Plugin',  // title, false=silent
    'sourcePath'    => dirname(__FILE__),       // from this directory (defults to plugin dir)
    'sourceFile'    => 'myawesomemu.class.php', // source file to copy
    'targetPath'    => WPMU_PLUGIN_DIR,         // destination folder (default to WPMU_PLUGIN_DIR)
    'targetFile'    => 'myawesomemu.php',       // destination file (defaults to sourceFile)
    'connectForm'   => true,                    // allow automatic redirect to file system connection form
);
• The first parameter ($action) is one of 'install', 'update', uninstall', or 'delete'. 'install' & 'update', as well as 'uninstall' and 'delete' do the same thing but display the action verb to the user, assumedly being more intuitive.
There are shortcuts for the first parameter:
$this->installer->install(...);
$this->installer->update(...);
$this->installer->uninstall(...);
$this->installer->delete(...);
• The second parameter ($installMethod) is used to pass an installer function used only if we must redirect to the file system "Connection Information" form. On return, this method will be called (and must be callable as a static method or an extension method). It is usually the method that originally invoked the installer, so if needed, it should be __METHOD__ or [__CLASS__,__FUNCTION__].
The only time this is needed is if you're doing some pre or post processing around the installer.
public static function my_installer() {
    $installOptions = array(...);
    // pre-process
    $this->installer->install(__METHOD__,$installOptions);
    // post-process
}
There are also actions that may accomplish the same (eacDoojigger_pre_install and eacDoojigger_post_install), or the '$onSuccess' callback parameter (below).
More often than not, this parameter can be, and should be, set to false.
• The third parameter ($installOptions) is the array of installer parameters (shown above) defining what is to be installed and where.
title is used to display a notice to the user when the action is completed or may be false to suppress notices.
sourceFile may be a single file name or a wildcard to handle multiple files (in which case, targetFile is not used).
If the installer requires file system credentials, these installer parameters are saved, then we redirect to the "Connection Information" form, then back to the originating page to retrieve the parameters and restart the installer process.
• A fourth parameter ($onSuccess) may be used to set a callback called immediately after your file is successfully installed but before determining if the install is successful. So if your callback function returns false, the installed file(s) are removed and the installation fails.
public static function my_installer() {
    $installOptions = array(...);
    $this->installer->install(__METHOD__,$installOptions, function($action,$installOptions)
        {
            // do something after file is installed
            return true;
        }
    );
}
Installers can also be queued to be run sequentially, either when invoked in your code or automatically when navigating to another page.
$this->installer->enqueue($action,false,$installOptions_a);
$this->installer->enqueue($action,false,$installOptions_b);
$this->installer->invoke(); // or on the next page-load.
A real-world example using enqueue with an installer method...
$this->add_action( 'version_updated', array( $this, 'admin_plugin_updated' ), 10, 3 );

public function admin_plugin_updated($curVersion, $newVersion, $asNetworkAdmin)
{
    $this->installer->enqueue('update',[$this,'install_autoloader']);
    $this->installer->invoke(); // or on the next page-load.
}

public function install_autoloader($action='install'): void
{
    $this->installer->invoke($action,[__CLASS__,__FUNCTION__],
        [
            'title'         => 'The {eac}Doojigger Autoloader',
            'sourcePath'    => $this->pluginHeader('VendorDir').'/Utilities',
            'sourceFile'    => 'eacDoojiggerAutoloader.php',
            'targetFile'    => 'eacDoojiggerAutoloader.php',
            'return_url'    => remove_query_arg('fs'),  // force reload after install
        ],
        function($action,$installOptions): bool         // callback onSuccess
        {
            // do stuff after installing
            return true;
        }
    );
}
Because the install is enqueued, it is dequeued when invoked. When dequeued, the installer method (install_autoloader) is called and the update runs.
Another real-world example that installs a "must use" plugin with support scripts in a sub-folder...
$this->installer->enqueue($action,false,
    [
        'title'         => false,
        'sourcePath'    => $this->pluginHeader('VendorDir').'/Utilities',
        'sourceFile'    => '*.php',
        'targetPath'    => WPMU_PLUGIN_DIR.'/eacDoojiggerEnvironment',
    ]
);
$this->installer->invoke($action,false,
    [
        'title'         => 'The {eac}Doojigger Environment Switcher',
        'sourcePath'    => $this->pluginHeader('VendorDir').'/Utilities',
        'sourceFile'    => 'eacDoojiggerEnvironment.class.php',
        'targetFile'    => 'eacDoojiggerEnvironment.php',
    ]
);
The first action enqueues the install of a sub-folder (eacDoojiggerEnvironment) within the 'mu_plugins' folder. The second action installs the primary script (eacDoojiggerEnvironment.php) into the "mu_plugins" folder then dequeues and runs the first action (the invoke'd action runs immediately, before the enqueue'd action).
New in Version 2.6 shortcut actions to invoke the installer methods:
do_action('eacDoojigger_installer_invoke', $installAction, $installMethod, $installOptions, $onSuccess)
do_action('eacDoojigger_installer_install', $installOptions)
do_action('eacDoojigger_installer_update', $installOptions)
do_action('eacDoojigger_installer_uninstall', $installOptions)
do_action('eacDoojigger_installer_delete', $installOptions)
Implementing and Using Advanced Mode
{eac}Doojigger's Advanced Mode is a small set of tools that can be used by derivative plugins to control or limit acces to options and/or features. In it's simplest form, Advanced Mode is a toggle, either on or off, and options or features may be made available or not based on that toggle.
How the toggle is set (or even if it is supported) as well as the ability to use multiple toggles or levels is much up to the developer.
{eac}Doojigger provides an array for a "global" setting and a "settings" setting, the latter pertaining to administrator options seen on the plugin's options page.
public $advanced_mode   = array(
    'global'        => array(
        'default'   => false,
    ),
    'settings'      => array(
        'default'   => false,
    ),
);
Derivative plugins may extend this array as needed to provide Advanced Mode settings for any number of features or simply use the array as-is.
The settings array is used when an administrator option field includes the advanced meta attribute:
// only available when advanced mode is enabled
'myTextField'   => array(
    'type'      =>  'textarea',
    'label'     =>  'A text field',
    'advanced'  =>  true,
);
Methods
There are 3 methods available to support Advanced Mode...
public function allowAdvancedMode(bool $allow = null): bool

public function setAdvancedMode( $is = true, string $what = null,string $level = null): void

public function isAdvancedMode(string $what = null, string $level = null): bool
To enable support for Advanced Mode, a plugin first calls allowAdvancedMode():
$this->allowAdvancedMode( true );This enables support but does not enable Advanced Mode.
To turn the Advanced Mode toggle on, use setAdvancedMode():
$this->setAdvancedMode( true );
$this->setAdvancedMode( true, 'global' );
$this->setAdvancedMode( true, 'global', 'default' );
The above 3 statements all do the same thing, turn the default global toggle on. To enable Advanced Mode for settings:
$this->setAdvancedMode( true, 'settings' );
$this->setAdvancedMode( true, 'settings', 'default' );
To extend options, say, for settings based on a license level:
$this->setAdvancedMode( true, 'settings', 'professional' );Then we can use "professional" with the "advanced" field meta attribute
'advanced' => 'professional',so that a field is only accessable when ['settings']['professional'] is true.
The third method, isAdvancedMode(), is used to check for Advanced Mode:
if ( $this->isAdvancedMode() ) {...}
if ( $this->isAdvancedMode( 'global' ) ) {...}
if ( $this->isAdvancedMode( 'global', 'default' ) ) {...}
As with setAdvancedMode(), these 3 statements do the same thing... check the ['global']['default'] value. To check a settings value:
if ( $this->isAdvancedMode( 'settings' ) ) {...}
if ( $this->isAdvancedMode( 'settings', 'default' ) ) {...}
if ( $this->isAdvancedMode( 'settings', 'professional' ) ) {...}
Filters
The allow_advanced_mode filter can be used to control Advanced Mode from a higher level. This filter may be used to enable or disable Advanced Mode as a whole based on the criteria necessary for your plugin. The allow_advanced_mode filter is triggered by the allowAdvancedMode() method.
$this->add_filter('allow_advanced_mode', array( $this, 'allow_advanced_mode'));
$this->allowAdvancedMode( true );

public function allow_advanced_mode(bool $allow): bool
{
    return $allow && $this->isProfessionalLicense();
}
The is_advanced_mode filter can be used like the isAdvancedMode() method.
$advancedMode = $this->apply_filters('is_advanced_mode',false,'settings');Constants
{eac}Doojigger, in its abstract class, checks for a {pluginName}_ADVANCED_MODE constant set in wp-config.php. If set to true, ['global']['default'] and ['settings']['default'] are set to true. Any additional settings must be handled by the derivative plugin. The easiest way to do this is by overloading the setAdvancedMode() method:
public function setAdvancedMode( $is = true, string $what = null,string $level = null): void
{
    if ($is === true && $what == 'settings')
    {
        $this->advanced_mode['settings']['standard']        = $this->isStandardLicense();
        $this->advanced_mode['settings']['professional']    = $this->isProfessionalLicense();
        $this->advanced_mode['settings']['enterprise']      = $this->isEnterpriseLicense();
    }
    parent::setAdvancedMode($is,$what,$level);
}
Toggling Advanced Mode
If/when $this->allowAdvancedMode() returns true, a not-so-obvious clickable link is added to the plugin settings page (the settings icon next to the plugin name/version title) so that Advanced Mode can be enabled or disabled from the page.
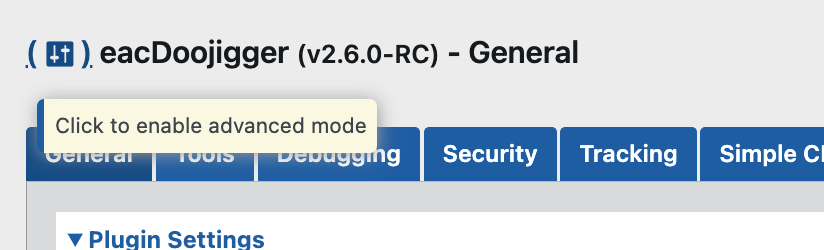
A similar link can be added elseware, such as a menu or button action, by using the add_admin_action_link() method:
$href = $this->add_admin_action_link( 'enable_advanced_mode' );
$href = $this->add_admin_action_link( 'disable_advanced_mode' );
This add_admin_action_link() url is handled by the {eac}Doojigger abstract class.
Important Notes
Advanced Mode is a user preference enabled or disabled on a per-user basis. The {pluginName}_ADVANCED_MODE constant set in wp-config.php overrides the user preference.
isAdvancedMode() bubbles up when checking for a true|false value.
If calling $this->isAdvancedMode('MyFeature','MyLevel') and ['MyFeature']['MyLevel'] is not set, ['MyFeature']['default'] is checked. If ['MyFeature']['default'] is not set, ['global']['MyLevel'] or ['global']['default'] is checked.
This means, for example, if checking a field attribute for a custom mode...
'myTextField'   => array(
    'type'      =>  'textarea',
    'label'     =>  'A text field',
    'advanced'  =>  'professional',
);
... and ['settings']['professional'] has not been set, the result will be that of ['settings']['default'].
If setting a custom mode with $this->setAdvancedMode(bool,'MyFeature','MyLevel'), and ['MyFeature']['default'] is not set, ['MyFeature']['default'] will be set to the opposite of ['MyFeature']['MyLevel'].
WP Consent API and Cookies
{eac}Doojigger supports the WP Consent API plugin with an enhanced set_cookie() method. Developers may safely use the set_cookie() method regardless of the presence of the API plugin.
public function set_cookie(string $name, string $value, $expires=0, array $options=[], $consent=[]): boolMethod Parameters
- $name - the cookie name
- $value - the cookie value
- $expires - when the cookie should expire.
- as a string (preferred) :
'90 days'- expires in 90 days.'3 months'- expires in 3 months.'1 year'- expires in 1 year.'session'- expires at the end of the browser session.'delete'or'expired'- removes the cookie.
- as a time offset :
90 * (24 * 60 * 60)- expires in 90 days.
- as a timestamp :
time() + (MONTH_IN_SECONDS * 3)- expires in 90 days.
- as a string (preferred) :
- $options - the PHP cookie options as an array.
'path' => COOKIEPATH,'domain' => COOKIE_DOMAIN,'secure' => is_ssl(),'httponly' => true,'samesite' => 'lax',
- $consent - defines the consent options and use of the cookie.
- as an array :
'plugin_or_service' => $this->pluginName,'category' => '','function' => '', // describe cookie functionality'collectedPersonalData' => '', // describe personal data collected'memberCookie' => false,'administratorCookie' => false,'type' => 'HTTP','domain' => ''
- as a string :
- the consent category.
- as a boolean :
- false, don't use WP Consent API.
- true, retrieve the consent array when previously registered with
set_cookie_consent().
- as an array :
Categories
The WP Consent API defines the following cookie categories:
Functional: Cookies used solely for transmitting communications over an electronic network. The technical storage or access is essential to enable the use of a specific service explicitly requested by the subscriber or user. If these cookies are disabled, the requested functionality will not be available, making them essential functional cookies.Preferences: Cookies or other local storage that do not fall under statistics, anonymous statistics, marketing, or functional categories, but are necessary for storing user preferences.Statistics: Cookies or other local storage used exclusively for statistical purposes, such as analytics.Statistics-anonymous: Cookies or other local storage used exclusively for anonymous statistical purposes (Anonymous Analytics Cookies), placed on a first-party domain, and not used to identify individuals.Marketing: Cookies or other local storage required to create user profiles, send advertising, or track users across websites for marketing purposes.
Your Consent Management Package (CMP) must map its categories to these categories to properly support the WP Consent API.
In addition, eacDoojigger adds:
necessary: Cookies or other local storage used exclusively to enable the functionality of the website or application. These cookies must not allow or enable transmission of any information to 3rd-parties. Cookies used by the WP Consent API, E-Commerce Plugins, and payment gateways are typically necessary.
necessary cookies are always allowed, regardless of user preferences.
* Instead of using the 'necessary' category, you could simply pass FALSE, an empty array, or omit the $consent argument to
set_cookie().
Examples
// set a unique preference cookie for 90 days
$this->set_cookie($cookieName, $value, "90 Days", [/* default options */],
    [
        'category' => 'preferences',
        'function' => __( '%s sets this cookie to assign a unique visitor ID to track preferences and activity.', $this->PLUGIN_TEXTDOMAIN )
    ]
);

// set a necessary session cookie for the current browser session
$this->set_cookie($session_cookie, $session_id, 'session', ['samesite'=>'strict'], 'necessary');
* If the
$consentparameter is omitted, empty, or false, the WP Consent API methods are not used.
* Iffunctionis omitted, the cookie will be unidentified and not registered withwp_add_cookie_info().
* Use of%swithinfunctionwill be replaced with theplugin_or_servicevalue.
Consent Management Packages
There are numerous options for CMPs to be installed on your WordPress system. Many have no support at all for the WP Consent API, some have only limited support.
A seemingly common issue is that the CMP does not set or update (in server-side PHP) the required consent_type within the WP Consent API.
To resolve this, eacDoojigger:
- Listens for a JavaScript event (
wp_consent_type_defined) that is part of the WP Consent API. - Sets a cookie (
wp_consent_consent_type) when that event is fired. - Adds a WordPress filter (
wp_get_consent_type) that reads the cookie to get the consent type.
If this still does not resolve the issue with your CMP, you can try adding this code snippet to your theme's functions.php (or elsewere) that will set a default consent_type if no other process sets a value. You may set this default to 'optout' (as shown) or 'optin' depending on your requirements or CMP plugin.
// set wp_consent_type if not set by a Consent Management Platform
add_filter('wp_get_consent_type',function($type)
    {
        return (empty($type)) ? 'optout' : $type;
    }
);
Additionally, you may want to change the default ('allow') consent for the necessary category with this filter:
// treat the 'necessary' category the same as 'functional'
add_filter('wp_has_consent', function($has_consent, $category, $requested_by) {
    return ($category == 'necessary') ? wp_has_consent('functional') : $has_consent;
},10,3);
Companion Methods
set_cookie_expiration()
Returns an array containing the expiration as an integer and as a string.
public function set_cookie_expiration($expires, bool $getString = true): array$this->set_cookie_expiration('90 days');
// array( 1731896992, '90 days' )
$this->set_cookie_expiration(MONTH_IN_SECONDS * 3);
// array( 1731897402, '2 months 29 days' )
set_cookie_consent()
Parses the above $consent array (with 'expires' included in either the $consent array or the $defaults array) and registers the cookie with wp_add_cookie_info().
public function set_cookie_consent(string $name, $consent, bool $register = true, array $defaults = []): arrayThis may be used ...
- To pre-define your cookie's consent parameters prior to setting your cookie.
- If your CMP requires cookie information to be registered at a specific time or through a specific process (not when the cookie is set).
You can then use get_cookie_consent() to retrieve previously registered consent array(s).
$this->set_cookie_consent($cookieName,
    [
        'expires'   => '90 days'
        'category'  => 'preferences',
        'function'  => __( '%s sets this cookie to assign a unique visitor ID to track preferences and activity.', $this->PLUGIN_TEXTDOMAIN )
    ]
);
/*
    'plugin_or_service' => 'eacDoojigger',
    'category' => 'preferences',
    'expires' => '90 days',
    'function' => 'eacDoojigger sets this cookie to assign a unique visitor ID to track preferences and activity.',
    'collectedPersonalData' => '',
    'memberCookie' => false,
    'administratorCookie' => false,
    'type' => 'HTTP',
    'domain' => 'eacdoojigger.earthasylum.com'
*/
get_cookie_consent()
Returns the consent array for a specified cookie, or an associative array for all cookies, for cookies previously registered with set_cookie_consent() .
public function get_cookie_consent($name = false): array
get_cookie()
Returns a sanitized cookie value or default value if the cookie is not set.
public function get_cookie(string $name, $default = null)Filters and Actions
Filters applied prior to calling PHP setcookie().
Compatible with WP Consent API:
apply_filters( 'wp_setcookie_expires', $expires, $name, $value );
apply_filters( 'wp_setcookie_path', $path, $name, $value );
apply_filters( 'wp_setcookie_domain', $domain, $name, $value );
apply_filters( 'wp_setcookie_category', $category, $name, $value );
Superset of (not included in) WP Consent API:
apply_filters( 'wp_setcookie_options', $options, $name );
apply_filters( 'wp_setcookie_consent', $consent, $name );
apply_filters( 'wp_setcookie_secure', $secure, $name, $value );
apply_filters( 'wp_setcookie_httponly', $httponly, $name, $value );
apply_filters( 'wp_setcookie_samesite', $samesite, $name, $value );
Action fired after successfully setting a cookie:
do_action( 'wp_setcookie_success', $name, $value, $options, $consent );Use Debugging Logger Methods
{eac}Doojigger has a built-in Debugging extension that allows several options, including what types of log entries are actually logged - Information, Notices, Warnings, Errors & Exceptions, Debugging.
Also included are several logging methods that fall into these categories.
PSR-3 Logging Method
First, the built in logger uses the PSR-3: Logger Interface and includes an easy to use log method:
public function log($level = '', string|\Stringable $message = '', array $context = [])$level- a PSR-3 LogLevel string or a PHP ErrorLevel integer.$message- the message to be logged$context- an optionalkey=>valuearray used to interpolate$message
$this->log('error', 'This is a fatal error message');
$this->log(E_USER_ERROR, 'This is a fatal error message');

$message = 'Account {account} has been deleted';
$context = ['account' => $account_num];
$this->log('notice', $message, $context);
$contextMAY contain@source(max 20 characters) to indicate the source identifier (the calling class or function) of the message (eacDoojigger uses the short class name by default).
$context['@source'] = basename(str_replace('\\', '/', get_class($this)));The log method may also be used to retrieve an instance of the Logger object and to call PSR-3 logger methods:
$this->log()->critical('This is a critical error message');
$logger = $this->log();
$logger->warning('This is a warning message');
Preferred Logging Methods
Additionally, there are preferred logging methods (with a different signature) that set $level and allow for logging of any type of variable (strings, arrays, objects, etc.):
Information
public function logInfo($variable, $message=null, array $context = []): voidNotices
public function logNotice($variable, $message=null, array $context = []): voidWarnings
public function logWarning($variable, $message=null, array $context = []): voidErrors & Exceptions
public function logError($variable, $message=null, array $context = []): voidDebugging
public function logDebug($variable, $message=null, array $context = []): voidAnd to always log, regardless of selected levels
public function logAlways($variable, $message=null, array $context = []): voidLastly, the logWrite method allows you to set the logging level using PSR-3 LogLevel or PHP ErrorLevel:
public function logWrite($level, $variable, $message=null, array $context = []): voidTypically, eacDoojigger uses these methods to log a data structure and to indicate where the log statement originated:
$this->logDebug($data, __METHOD__);
$this->logDebug($data, current_action());
Accessing Log Data
eacDoojigger's logging object doesn't actually write any log files, that is handled by the debugging extension which 'subscribes' to the logging data.
You can write your own method or function to access this data...
- Subscribe to the logger (in a
plugins_loadedaction):
$this->log()->subscribe( [ $this, 'my_log_data' ] );- Define your method to receive the data:
public function my_log_data( $data ) {...}$data is an array:
level- LogLevel::LOG_ERROR/LOG_WARNING/LOG_NOTICE/LOG_DEBUG/LOG_ALWAYSmessage- the message to be loggedcontext- the context arrayerror_code- PHP ErrorLevel or PSR-3 LogLevelprint_code- textual error code
The context array MAY contain:
- a
@variableelement holding any type of variable passed with this log entry. - a
wp_errorelement if the log() call passed a WP_ERROR object. - a
php_errorelement if the log() call passed a PHP error. - a
exceptionelement if the log() call passed a throwable/exception object.
Here is a very simple example that displays the print_code and message:
eacDoojigger()->Log()->subscribe(function($data)
    {
        $message = sprintf('%s: %s',$data['print_code'],$data['message']);
        echo "<div class='notice'>".$message."</div>";
    }
);
Notice
- As with all eacDoojigger methods, when working within eacDoojigger, a derivative plugin, or an extension class, use
$this->or$this->plugin->to call the method. When working from outside of the eacDoojigger environment (i.e. infunctions.php) useeacDoojigger()->.
\eacDoojigger()->logDebug($structure, current_action());-
The debugging extension creates log files in either the same place as the WP
debug.log(if WP_DEBUG_LOG is set to a pathname), the WP uploads folder, or the WP content folder. -
Debugging and logging should only be used on staging sites and/or only when necessary.
-
Enabling the debugging extension and using the logger will add some overhead to your site.
-
Enabling the debugging extension and using the logger may add some security risks to your site.
- If possible, set WP_DEBUG_LOG to a path outside of your web space.
Example Debugging Output
--- Wed Aug 28 2024 EDT  via https  [19:28:56.7008] - IP:n.n.n.n HTTP/1.1 POST https://earthasylum.com/wp-login.php
--- eacDoojigger         -----      [19:28:56.7364] - EarthAsylumConsulting\Plugin\eacDoojigger: version 2.6.1 2024-07-14 09:46:50
--- eacDoojigger         critical   [19:28:56.7714] - This is a critical message
--- eacDoojigger         emergency  [19:28:56.7714] - This is an emergency message
--- eacDoojigger         notice     [19:28:56.7714] - This is a notice message
--- eacDoojigger         debug      [19:28:56.7714] - This is a debug message with an empty array: array (
)
--- eacDoojigger         error      [19:28:56.7717] - wp_error object: array (
  'WP_Error' =>
  array (
    'code' => 'error_code',
    'message' => 'WP_ERROR passed as $variable',
    'data' => NULL,
  ),
)
--- phpErrorHandler      warning    [19:28:56.7718] - ltrim(): Passing null to parameter #1 ($string) of type string is deprecated: array (
    [type] => Deprecated
    [message] => ltrim(): Passing null to parameter #1 ($string) of type string is deprecated
    [file] => wp-includes/formatting.php
    [line] => 4482
)
--- exit https                      [19:28:57.0860] - Duration: 0.3852 Seconds, Peak Memory Used: 16M of 192M
Using Conditional Traits in PHP
I've found that within {eac}Doojigger, extensions, and any plugin, that a substantial amount of code is dedicated to backend or administrator functions. This doesn't bode well on the frontend as all of this unneeded code is loaded.
To alleviate this, we can use make-shift conditional traits...
-
Create a small trait file:
myAwesomeTraits.trait.php<?php namespace myAwesomeNamespace; if ( ! is_admin() ) { trait myAwesomeTraits {} } else require "myAwesomeTraits.admin.php"; -
Create your administrator trait file:
myAwesomeTraits.admin.php<?php namespace myAwesomeNamespace; trait myAwesomeTraits { // your administration methods public function myAwesomeAdmin() { } } -
Include your trait file in your plugin or extension
require "myAwesomeTraits.trait.php";

class myAwesomePlugin extends \EarthAsylumConsulting\abstract_context
{
    /**
     * @trait myAwesomeTraits, loads only admin methods
     */
    use \myAwesomeNamespace\myAwesomeTraits;
}
Using this method you can control what code gets loaded for backend (or frontend) use.
Clone an {eac}Doojigger Extension
Let's say you want to use the session manager included with {eac}Doojigger as an extension to your own plugin (myAwesomePlugin).
Create session_manager.extension.class.php in your myAwesomePlugin Extensions folder:
namespace myAwesomeNamespace\Extensions;

if ( class_exists('\EarthAsylumConsulting\Extensions\session_extension') )
{
    return new \EarthAsylumConsulting\Extensions\session_extension($this);
}
This works for extensions included with {eac}Doojiger but what about extension plugins? Let's try eacMetaPixel to add Facebook tracking to your plugin...
(almost the same but the auto-loader may not know where to find the extension if it hasn't been loaded yet.)
Create metapixel.extension.php in your myAwesomePlugin Extensions folder:
namespace myAwesomeNamespace\Extensions;

if ( class_exists('\EarthAsylumConsulting\Extensions\metapixel_extension') )
{
    return new metapixel_extension($this);
}
if ( file_exists(WP_PLUGIN_DIR.'/eacmetapixel/Extensions/metapixel.extension.php') )
{
    return require(WP_PLUGIN_DIR.'/eacmetapixel/Extensions/metapixel.extension.php');
}
This will load the metapixel extension, if it is installed, whether or not it is activated.
In both, the extension will be loaded by and will extend your plugin. Extension settings will be added to your options page and those settings will be stored with your plugin settings, prefixed with your plugin name.
Using administrator option field methods
Creating custom post types or taxonomies?
There are several methods used by {eac}Doojigger to create the administrator options screens. These methods may also be used outside of the plugin settings page for which they were created.
Note: These examples should only be used when on your custom screen. You can ensure that by checking the current screen id:
if (get_current_screen()->id !== 'edit-my-screen-id') return;
These html_input methods are made available by using the html_input_fields trait in your plugin.
use \EarthAsylumConsulting\Traits\html_input_fields;A simple example is to first create an array of field definitions similar to the plugin and extension options (see {eac}Doojigger: Administrator Options)...
$myFormOptions =
[
        'registrar_name'        => array(
                            'type'      =>  'text',
                            'label'     =>  'Registrar Name',
                        ),
        'registrar_phone'       => array(
                            'type'      =>  'tel',
                            'label'     =>  'Registrar Telephone',
                        ),
        'registrar_contact'     => array(
                            'type'      =>  'email',
                            'label'     =>  'Registrar Support Email',
                        ),
        'registrar_web'     => array(
                            'type'      =>  'url',
                            'label'     =>  'Registrar Web Address',
                        ),
];
html_input_style()
To incorporate the css style declarations needed for the embedded html, use the html_input_style() method...
add_action( 'admin_enqueue_scripts', array($this, 'html_input_style') );html_input_block()
Then, where you want the form fields displayed, add the grid container and each of the fields, including label and input elements, using the html_input_block() method...
echo "<div class='settings-grid-container'>\n";
foreach ($myFormOptions as $optionKey => $optionData)
{
    $optionValue = ?;   // get the current value for the field
    echo $this->html_input_block($optionKey, $optionData, $optionValue);
}
echo "</div>\n";
html_input_sanitize()
To sanitize these fields when your form is submitted, use the html_input_sanitize() method...
foreach ($myFormOptions as $optionKey => $optionData)
{
    if (array_key_exists($optionKey,$_POST) )
    {
        $value = $this->html_input_sanitize($_POST[$optionKey], $optionKey, $optionData);
        if ($_POST[$optionKey] == $value)
        {
            // input is valid (passed sanitization), do something with it
        }
        else
        {
            // input is invalid, let the user know
            $this->add_option_error($optionKey,
                sprintf("%s : The value entered does not meet the criteria for this field.",$optionData['label'])
            );
        }
    }
}
html_input_validate()
The html_input_validate method uses and calls the field's 'validate' callback method (if set).
foreach ($myFormOptions as $optionKey => $optionData)
{
    if (array_key_exists($optionKey,$_POST) )
    {
        $value = $this->html_input_validate($_POST[$optionKey], $optionKey, $optionData);
    }
}
html_input_section()
For a more advanced layout with multiple blocks or sections of input fields...
$myFormSections =
[
    'registrar_contact'     =>
    [
            'registrar_name'        => array(
                                'type'      =>  'text',
                                'label'     =>  'Registrar Name',
                            ),
            'registrar_phone'       => array(
                                'type'      =>  'tel',
                                'label'     =>  'Registrar Telephone',
                            ),
            'registrar_contact'     => array(
                                'type'      =>  'email',
                                'label'     =>  'Registrar Support Email',
                            ),
            'registrar_web'     => array(
                                'type'      =>  'url',
                                'label'     =>  'Registrar Web Address',
                            ),
    ],
    'registration_defaults' =>
    [
        // ...
    ],
    'license_limitations'   =>
    [
        // ...
    ],
];
Add the fields in each section with a section header and fieldset (html_input_section())...
foreach ($myFormSections as $groupName => $myFormOptions)
{
    echo $this->html_input_section($groupName, $myFormOptions);
    foreach ($myFormOptions as $optionKey => $optionData)
    {
        $optionValue = ?;   // get the current value for the field
        echo $this->html_input_block($optionKey, $optionData, $optionValue);
    }
    echo "</fieldset>\n";
    echo "</section>\n";
}
Then sanitize the fields from each section using html_input_sanitize() when the form is submitted...
foreach ($myFormSections as $groupName => $myFormOptions)
{
    foreach ($myFormOptions as $optionKey => $optionData)
    {
        if (array_key_exists($optionKey,$_POST) )
        {
            $value = $this->html_input_sanitize($_POST[$optionKey], $optionKey, $optionData);
            if ($_POST[$optionKey] == $value)
            {
                // input is valid (passed sanitization), do something with it
            }
            else
            {
                // input is invalid, let the user know
                $this->add_option_error($optionKey,
                    sprintf("%s : The value entered does not meet the criteria for this field.",$optionData['label'])
                );
            }
        }
    }
}
add_option_error()
The add_option_error(), add_option_warning(), add_option_info(), and add_option_success() methods are similar to the WordPress add_settings_error() function with a slightly more advanced API that allows administrator notifications to be added anywhere on the page (befor the footer) and to survive a page reload or redirect.
Convert vertical section headers to horizontal tabs
Easily change a long vertical page with multiple input field sections into a tab layout with each section as a tab.
First add an element with a class of 'tab-container' where you want the tabs...
<nav class='tab-container'></nav>Next add a 'true' boolean to the html_input_style() method...
add_action( 'admin_enqueue_scripts', function()
    {
        $this->html_input_style(true);
    }
);
This will include the css and javascript needed for tab functionality.
Additionally, you can pass an element selector which will have its visibility style changed to 'visible'.
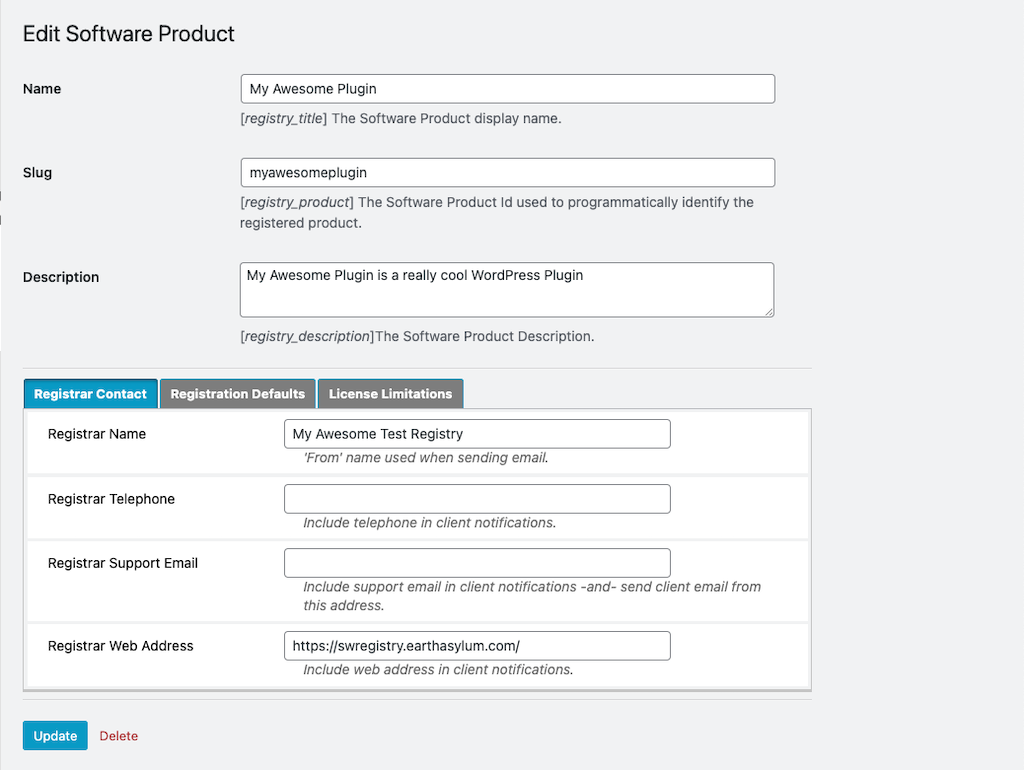
$this->html_input_style(true,'table.form-table');Screen Shot
These examples where derived from the Software taxonomy custom taxonomy extension used by {eac}SoftwareRegistry.
Using administrator contextual help methods
Taking the examples above and adding contextual help when adding fields is very simple.
First, in your constructor, add something like this to render the help screen.
add_action( 'current_screen',       function($screen)
    {
        if ($screen->id == 'edit-' . 'my-awesome-screen')
        {
            $this->addPluginHelpTab('My Awesome Screen', $content, ['My Awesome Screen','open']);
            $this->plugin_help_render($screen);
        }
    }
);
Then where you render your fields, render the field-level help with html_input_help()
foreach ($myFormSections as $groupName => $myFormOptions)
{
    echo $this->html_input_section($groupName, $myFormOptions);
    foreach ($myFormOptions as $optionKey => $optionData)
    {
        $this->html_input_help('My Awesome Screen', $optionKey, $optionData);
        if ($optionData['type'] == 'help') continue;

        $optionValue = ?;   // get the current value for the field
        echo $this->html_input_block($optionKey, $optionData, $optionValue);
    }
    echo "</fieldset>\n";
    echo "</section>\n";
}
See Providing Contextual Help for more details.