Defining options (settings) in WordPress Administration used by {eac}Doojigger, derivative plugins, and extensions.
Document Header
Homepage:https://eacDoojigger.earthasylum.com/
Author:EarthAsylum Consulting
Last Updated:29-Apr-2025
Contributors:EarthAsylum Consulting, Kevin Burkholder
Donate link:https://github.com/sponsors/EarthAsylum
Requires {eac}Doojigger:3.1
WordPress URI:https://wordpress.org/plugins/search/earthasylum/
GitHub URI:https://github.com/EarthAsylum/docs.eacDoojigger/wiki/
Description
Summary
Options are an important part of any plugin or extension when you need to provide the administrator with the ability to set or choose some variable or alternative in your plugin.
{eac}Doojigger makes it easy to add options to the plugin's administrator settings screen.
To use these options and method on other administrator screens, such as custom posts or taxonomies, see Using {eac}Doojigger: Using administrator option field methods
Registering Options
First, when defining options, they must be registered with the base plugin.
For a Doojigger (derivative) plugin, this is done with:
$this->registerPluginOptions( {option_group}, {option_meta} );or
$this->registerNetworkOptions( {option_group}, {option_meta} );registerPluginOptions() is used for site administrator options while registerNetworkOptions() is used for network (multi-site) administrator options.
For network (multi-site) installations, both may be used; options registered with $this->registerNetworkOptions() are available only on the network admin page; options registered with $this->registerPluginOptions() are available only on the individual site admin page.
You may use $this->get_network_option() or $this->is_network_option() to access network options from the individual sites. On single-site installations, $this->registerNetworkOptions() does nothing. $this->get_network_option() returns null and $this->is_network_option() returns false.
{option_group} is the group name under which the options will appear. {eac}Doojigger uses 'plugin_settings' for site options and 'network_settings' for network options.
{option_group} may also be an array with 2 values. The first being the group name as above, the second being the name of a tab you wish the options to appear on. The default tab is "General".
$this->registerPluginOptions( [ 'plugin_settings' , 'general' ], {option_meta} );{option_meta} is an array of options to be added/registered (see below).
For a Doololly (extension), the following methods may be used, using the same format as above.
In the extension's __construct() method, the extension must register itself with the base plugin. In doing so, it can also register options using:
$this->registerExtension( {option_group}, {option_meta} );Where {option_group} is typically the short class name ($this->className)
If, after registering, the extension needs to add additional options, it can do so using:
$this->registerExtensionOptions( {option_group}, {option_meta} );This can be done in the __construct(), the initialize(), or the addActionsAndFilters() method.
Version 6.7+ of WordPress
WordPress version 6.7 introduced an integrity check on language translations that emitted a notice if a translation is attempted too early in the load process (Function_load_textdomain_just_in_time was called incorrectly). The above register methods attempt to translate some of the parameters passed and would thus trigger the WordPress translation notice.
Optimizing Option Registration
It is rare that plugin or extension options are needed anywhere but within the plugin's administrator settings page. The preferred method to register your settings is to use the just-in-time options_settings_page action, within the admin_init action, that is fired right before rendering the settings html page.
public function __construct(array $header)
{
    add_action('admin_init', function()
    {
        // register the extension
        $this->registerExtension( [$this->className, {admin_tab_name}] );
        // add extension options when needed
        $this->add_action( "options_settings_page", array($this, 'admin_options_settings') );
    });
}

public function admin_settings_page()
{
    $this->registerPluginOptions( [ 'plugin_settings' , 'general' ], {option_meta} );
}
Extensions may still register in their constructor, then add options later...
public function __construct(array $header)
{
    $this->registerExtension( ['my_extension', 'my_tab_name'] );
    $this->add_action( "options_settings_page", array($this, 'admin_settings_page') );
}

public function admin_settings_page()
{
    $this->registerExtensionOptions( 'my_extension', {option_meta} );
}Meta Data
The {option_meta} array mentioned above is an array of arrays defining options/settings that can be updated from the plugin's 'settings' page.
- Each option name is automatically prefixed with the plugin name (i.e. 'eacDoojigger' or 'myAwesomePlugin').
- Option names must be unique across the plugin and all extensions.
An option is defined as:
'my_option_name'   => array(
            'type'          =>  'type: {input type}'
            'label'         =>  'label: {field label}'
            'title'         =>  'title: information text/html to be displayed'
            'before'        =>  'before: text/html to be displayed before field'
            'options'       =>  array({option,...})
            'default'       =>  'default: {default option or value}'
            'after'         =>  'after: text/html to be displayed after field'
            'info'          =>  'info: Information/instructions',
            'tooltip'       =>  Information/instructions provided as tooltip popup
            'help'          =>  contextual help
            'attributes'    =>  html attributes array ['name="value", name="value"']
            'class'         =>  css class name(s) (added to attributes)
            'style'         =>  css style declaration(s) (added to attributes)
            'encrypt'       =>  true
            'sanitize'      =>  callable function to override internal sanitization
            'validate'      =>  callable function to validate after sanitizing
            'filter'        =>  array passed to PHP filter_var [filter_type, options]
            'script'        =>  inline javascript added after field.
            'advanced'      =>  true - limit access only when in advanced mode.
    ),
The option array is registered as:
$this->registerPluginOptions( [ 'plugin_settings' , 'general' ],
    [
        $array_of_option
    ]
);
my_option_name screen shot

Option name
The option name may be any valid name passed to the WordPress option methods. If the name is prefixed with '_', '-', or '.' it will not be saved to the database. This is most useful for button or display options.
Option type
The option type value can be any html input type (text, textarea, select, checkbox, radio, etc.). As well as:
codeedit-js,codeedit-html,codeedit-css,codeedit-php- These types invoke the code editor in a textarea field.
- You must ensure proper validation and use of the submitted values for these field types.
html- invokes the WordPress HTML editor using timymce and quickedit.
- supports a
wp_editorarray to override the wp_editor settings.
help- Adds contextual help to the help screen for the screen-section (option_group) as opposed to field-level help.
- Uses
labelandhelpoptions. Ex:'help'=>'<details><summary>[title]</summary>...</details>'
switch- A single checkbox field, displayed as a toggle switch.
display- a custom display field which will transform none-scalar values.
disabled- a disabled text field.
readonly- a disabled text field that can be enabled by double-clicking.
custom- a custom input field defined and processed by your filter code.
Option label
The label value is used as the html <label> value.
Option title
The title value is displayed as a <blockquote> above the field.
Option before
The before value is displayed immediately before the input field.
Option options
The options value is a list or array of options and values used in select, checkbox, and radio fields.
Option default
The default value for the option (when the option is not yet set in the wp_options table). May be a single string or an array (for checkbox options).
Option after
The after value is displayed immediately after the input field.
Option info
The info value is displayed as a <cite> below the field.
Option tooltip
The tooltip value is displayed as a hover popup to the right of the field. If not set or set to true, the value of the info option is used (provided the value doesn't change when processed through wp_kses) and info is removed.
Option help
The help value is used for field-level contextual help. If absent, title & info (default & info for help fields) are used.
Option attributes
The attributes values are passed to the input field as name=value attributes.
Option class
The class value is a string of CSS/DOM class names passed to the input field.
Option style
The style value is a string of CSS style declarations passed to the input field.
Option encrypt
The encrypt option (when truthy) causes the value to be encrypted before being stored in the database. When retrieving the option, use $this->get_option_decrypt(...);
Option sanitize
The sanitize option may be used to override the internal sanitization methods with your own function or to bypass sanitization (if set to false). If the value returned from the sanitize method is different from the value posted, a notification is presented to the user and the value is reverted to the prior value (or null).
Option validate
The validate option may be used to further validate the option value after sanitization. Unlike 'sanitize', may alter the value without consequence.
Option filter
The filter option uses the PHP filter_var() function and may be used to add an additional filter to sanitize or validate the option value when submitted. To use a custom callback, set filter to: [ FILTER_CALLBACK, ['options'=>'callback_method'] ].
Option script
Because script tags will be filtered out of other options, this option may be used to add in-line javascript code for the input field.
Option advanced
The "advanced" option may be set to true (or a custom value) to limit access based on the current Advanced Mode toggle. See Implementing and Using Advanced Mode
Other Values
width and height may also be set to control the width (columns) of a field and/or the height (rows) of a textarea field.
* Meta replacement
- Several options can insert other option values by including the option name in brackets:
- [label],[default],[title],[before],[after],[info],[tooltip],[help]
- Ex:
'help'=>'[title]<p>[info]</p>'
* options and attributes values may be coded in several formats:
- as a single string (with multiple attributes)
"Option1 Option2"or"Option1='v1' Option2='v2'""placeholder='First Name'"or"min='0' max='12' step='1'".
- as an array of strings
["Option1='v1'", "Option2='v2'"]["placeholder='First Name'"]or["min='0'", "max='12'", "step='1'"].
- as a name=>value array
['Option1'=>'v1', 'Option2'=>'v2']['placeholder'=>'First Name']or['min'=>'0', 'max'=>'12', 'step'=>'1'].
- as an array of arrays
[ ['Option1'=>'v1'], ['Option2'=>'v2'] ][ ['placeholder'=>'First Name'] ]or[ ['min'=>'0'], ['max'=>'12'], ['step'=>'1'] ].
Uses
$this->parseAttributes()to parse options and attributes usingSimpleXMLElement()to return an associative (name=>value) array; option and attribute strings must be quoted.
File Upload
When using
'type' => 'file'to upload a file, the default sanitation method uploads the file and processes it throughwp_handle_upload(), placing the file in youruploadsfolder and returning the array from wp_handle_upload as the option value. You may further process the file via theoptions_form_post_{option_name}filter.
See the 'myOptionsTest' plugin included in the 'Extras' folder for a complete example of all input types.
Filters and Actions
Three filters are available for all option fields.
1) The first, to process the input field meta data.
The filter name is options_field_meta_{option_name}. It takes 2 arguments:
- $metaData - the option meta data/field definition.
- $currentValue - the current field value (or null).
Your filter must return the meta data array of the field.
$this->add_filter( 'options_field_meta_my_option_name', array($this, 'field_meta_my_option_name'), 10, 4 );

public function field_meta_my_option_name($metaData, $currentValue)
{
    return $metaData;
}
2) The second, to modify the definition of the input field (the input html):
The filter name is options_form_input_{option_name}. It takes 4 arguments:
- $html - the current/default html for the field.
- $fieldName - the field/option name.
- $metaData - the option meta data/field definition.
- $currentValue - the current field value (or null).
Your filter must return the html to display the field.
$this->add_filter( 'options_form_input_my_option_name', array($this, 'form_input_my_option_name'), 10, 4 );

public function form_input_my_option_name($html, $fieldName, $metaData, $currentValue)
{
    $html = "<input ... />";
    return $html;
}
3) The third, to process the posted value when submitted:
The filter name is options_form_post_{option_name}. It takes 4 arguments:
- $value - the submitted value of the field.
- $fieldName - the field/option name.
- $metaData - the option meta data/field definition.
- $priorValue - the prior field value (or null).
Your filter must return the value of the field.
$this->add_filter( 'options_form_post_my_option_name', array($this, 'form_post_my_option_name'), 10, 4 );

public function form_post_my_option_name($value, $fieldName, $metaData, $priorValue)
{
    return $value;
}
Notes
custominput fields must use these filters to define the input html and to validate & sanitize the posted value.- The third,
options_form_post_{option_name}filter is useful for other field types, such as buttons, to perform an action when submitted.- See also Option Validation (
sanitize_optionfilter)
One action is available when the options form is posted. This action is fired after all posted fields have been processed and updated.
The action name is options_form_post. It takes one argument:
- $postArray - an associative array with the keys being the names of the field/option and the array being the option meta data. Two elements are added to that array:
- priorValue - the prior field value.
- postValue - the submitted value of the field.
Actions have no return value.
$this->add_action( 'options_form_post', array($this, 'my_options_form_post') );

public function my_options_form_post($postArray)
{
    foreach ($postArray as $fieldName => $metaData)
    {
        if ($metaData['postValue'] != $metaData['priorValue'])
        {
            echo "<p>{$fieldName} has changed from {$metaData['priorValue']} to {$metaData['postValue']}</p>";
        }
    }
}Validation
When options are saved (posted) from the WordPress administration screen, each value is sanitized and validated (where possible). Checkbox, radio, and select fields have known possible values; values submitted are validated to those known values. Other option values are properly sanitized through WordPress or PHP sanitization helpers according to the option's html input type. Any value that fails sanitization is restored to its previous value. All values are sanitized for safety but may not be validated to specific needs.
It is your responsibility to sanitize and validate any user input values according to WordPress standards and your specific requirements. Do not rely on the browser or JavaScript to validate critical values.
To provide custom validation and sanitization, you may use the aforementioned sanitize and/or validate option or the options_form_post_{option_name} filter. All take the same arguments and must return the sanitized/validated value.
$this->add_filter( 'options_form_post_my_option_name', array($this, 'sanitize_my_option_name'), 10, 4 );

public function sanitize_my_option_name($value, $fieldName, $metaData, $priorValue)
{
    // sanitize the value, e.g.
    $value = sanitize_title_with_dashes($value);
    // further validation here
    return $value;
}
Or you may use the sanitization filter that all option values are passed through. Like the options_form_post_{option_name} filter, the sanitize_option filter takes 4 arguments:
- $value - the submitted value of the field.
- $fieldName - the field/option name.
- $metaData - the option meta data/field definition.
- $priorValue - the prior field value (or null).
Your filter must return the value of the field.
$this->add_filter( 'sanitize_option', array($this, 'my_sanitize_option'), 10, 4 );

public function my_sanitize_option($value, $fieldName, $metaData, $priorValue)
{
    switch ($fieldName)
    {
        case 'my_option_name':
            // sanitize the value, e.g.
            $value = sanitize_title_with_dashes($value);
            // further validation here
            break;
    }
    return $value;
}
Use caution with
codeedit,html, andcustomfield types.codeeditandhtmlfields are passed only through thewp_kses()function and cannot be further sanitized automatically.customfields are not processed at all other than by the filter(s) you provide. You must ensure proper use of the submitted values for these field types.
Error Notification
You may use these convenience methods to notify the user of any validation errors:
$this->add_option_error( string $optionName, string $message )
$this->add_option_warning( string $optionName, string $message )
$this->add_option_info( string $optionName, string $message )
$this->add_option_success( string $optionName, string $message )
These methods use a short-lived transient so that messages may survive a page reload.
Examples
Plugins must register any options with:
$this->registerPluginOptions( [ 'plugin_settings' , 'general' ],
    [
        'my_option_name'   => array(
                        'type'          =>  'type: {input type}',
                        'label'         =>  'label: {field label}',
                        'title'         =>  'title: information text/html to be displayed',
                        'options'       =>  array({option,...}),
                        'default'       =>  'default: {default option or value}',
                        'info'          =>  'info: Information/instructions',
                        'attributes'    =>  html attributes array ['name="value", name="value"']
                ),
    ]
);
Plugins should use the options_settings_page action
public function __construct(array $header)
{
    $this->add_action( "options_settings_page", array($this, 'admin_settings_page') );
}

public function admin_settings_page()
{
    $this->registerPluginOptions( [ 'plugin_settings' , 'general' ],
        [
            'my_option_name'   => array(
                            'type'          =>  'type: {input type}',
                            'label'         =>  'label: {field label}',
                            'title'         =>  'title: information text/html to be displayed',
                            'options'       =>  array({option,...}),
                            'default'       =>  'default: {default option or value}',
                            'info'          =>  'info: Information/instructions',
                            'attributes'    =>  html attributes array ['name="value", name="value"']
                    ),
        ]
    );
}
Extensions must register with:
$this->registerExtension( [ $this->className , 'my_tab_name' ] );Extensions should use the options_settings_page action
public function __construct(array $header)
{
$this->registerExtension( [ $this->className , 'my_tab_name' ] );
$this->add_action( "options_settings_page", array($this, 'admin_settings_page') );
}
public function admin_settings_page()
{
$this->registerExtensionOptions( [ $this->className , 'my_tab_name' ],
[
'my_option_name' => array(
'type' => 'type: {input type}',
'label' => 'label: {field label}',
'title' => 'title: information text/html to be displayed',
// 'options' => array({option,...}),
'default' => 'default: {default option or value}',
'info' => 'info: Information/instructions',
// 'attributes' => html attributes array ['name="value", name="value"']
),
]
);
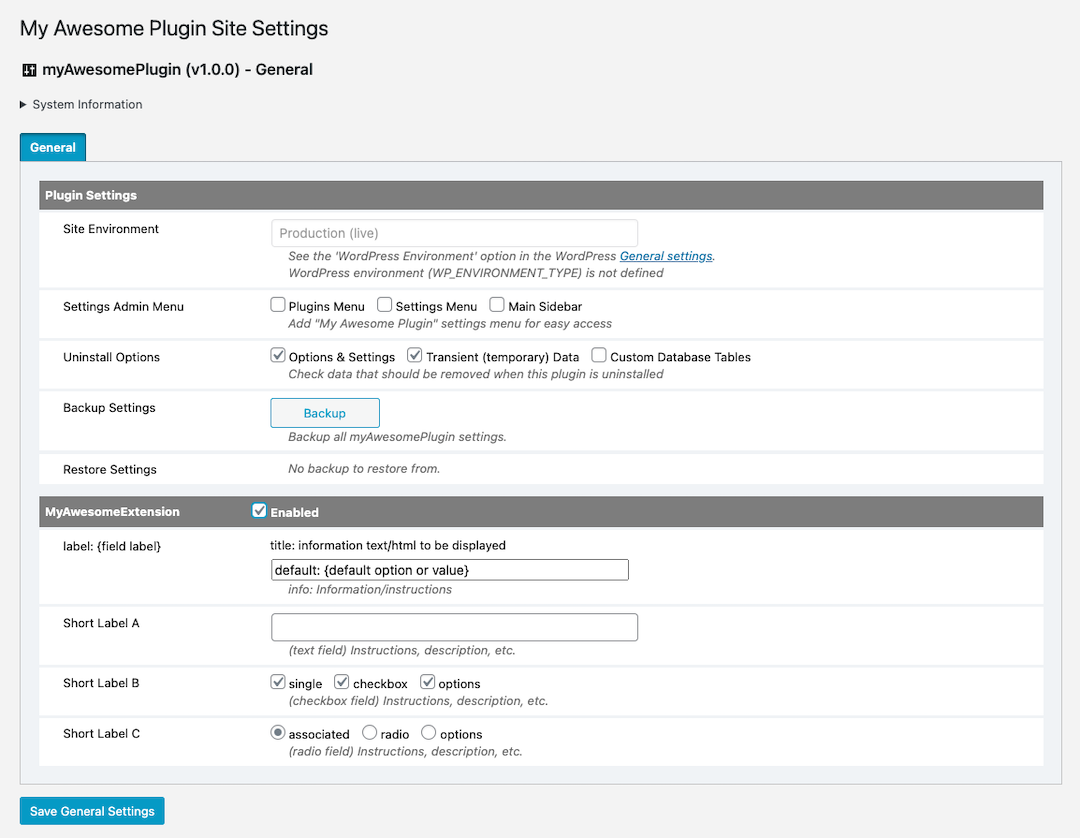
}Example (myAwesomePlugin):
/* using pre-defined option fields (from standard_options trait) */
$this->registerPluginOptions('plugin_settings',$this->standard_options(
    [
        'siteEnvironment',
        'adminSettingsMenu',
        'uninstallOptions',
        'backupOptions',
        'restoreOptions'
    ]
));
Example (myAwesomeExtension):
$this->registerExtensionOptions( [ $this->className, 'Awesome Examples' ],
    [
        'my_option_name'    => array(
                                'type'          =>  'type: {input type}',
                                'label'         =>  'label: {field label}',
                                'title'         =>  'title: information text/html to be displayed',
                            //  'options'       =>  array({option,...}),
                                'default'       =>  'default: {default option or value}',
                                'info'          =>  'info: Information/instructions',
                            //  'attributes'    =>  html attributes array ['name="value", name="value"']
                            ),
        'my_option_name_a'  => array(
                                'type'          =>  'text',
                                'label'         =>  "Short Label A",
                                'info'          =>  "(text field) Instructions, description, etc."
                            ),
        'my_option_name_b'  => array(
                                'type'          =>  'checkbox',
                                'label'         =>  "Short Label B",
                                'options'       =>  ['single','checkbox','options'],
                                'default'       =>  ['single','checkbox','options'],
                                'info'          =>  "(checkbox field) Instructions, description, etc."
                            ),
        'my_option_name_c'  => array(
                                'type'          =>  'radio',
                                'label'         =>  "Short Label C",
                                'options'       =>  [ ['associated'=>'A'],['radio'=>'R'],['options'=>'O'] ],
                                'default'       =>  'A',
                                'info'          =>  "(radio field) Instructions, description, etc."
                            ),
    ]
);
See Also
- The Screen Shots for the output of these 2 examples.
- {eac}Doojigger Contextual Help
- Implementing and Using Advanced Mode
Screen Shots
- My Awesome Plugin with My Awesome Extension
-
Pingback: EarthAsylum Consulting Doojigger Plugin for WordPress - EarthAsylum Consulting
-
Pingback: EarthAsylum Consulting Doojigger Plugin for WordPress - Kevin Burkholder